Mastering the Plank: Common Mistakes and Fixes
The plank is a fundamental isometric exercise that appears in many workout routines, from beginner programs to advanced athletic training. Its appeal lies in its simplicity: it requires no equipment, can be done anywhere, and targets multiple muscle groups simultaneously. However, the plank’s effectiveness and safety depend heavily on proper form and alignment. Without attention to detail, this exercise can lead to discomfort, particularly in the lower back, and fail to deliver the intended benefits. This article explores the mechanics of the plank, common mistakes practitioners make, and practical corrections to help you perform the exercise with confidence and efficiency.
Understanding the plank begins with recognizing its purpose: to build endurance and stability in the core, which includes the abdominal muscles, obliques, and lower back. A well-executed plank engages these muscles to maintain a neutral spine and prevent excessive movement. The exercise is often recommended as part of a balanced fitness routine, but its quality matters more than the duration. By focusing on alignment and muscle engagement, you can minimize strain and maximize the exercise’s potential. The following sections break down the key aspects of performing a plank correctly, address frequent errors, and offer actionable fixes.
The Foundation of a Proper Plank
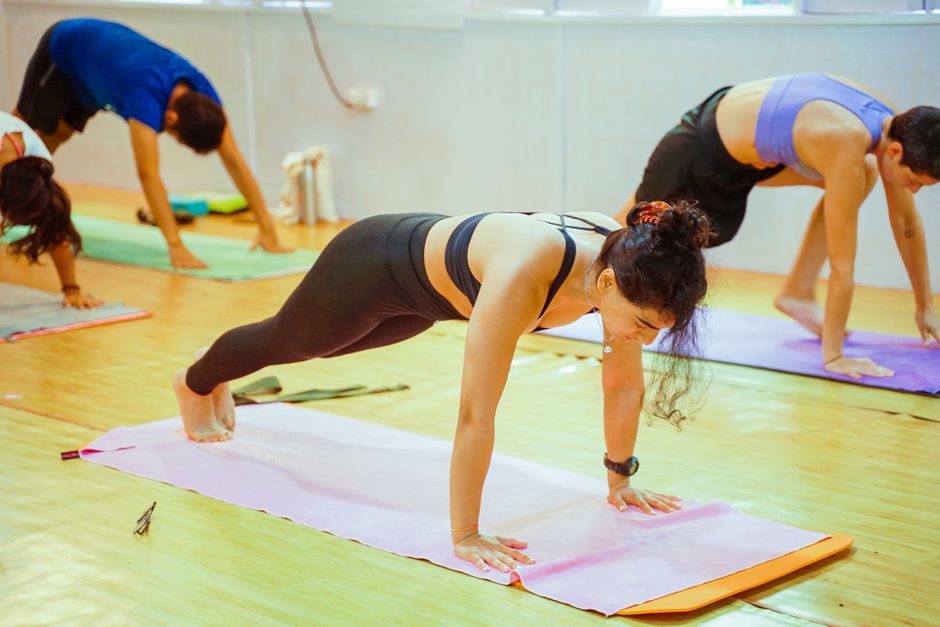
Before attempting any corrections, it is essential to understand the foundational elements of a proper plank position. Start by placing your forearms on the ground, elbows directly under your shoulders, and hands either flat or clasped. Your body should form a straight line from your head to your heels, with your feet hip-width apart for stability. Your core should be actively engaged, meaning you gently draw your navel toward your spine without holding your breath. This action helps stabilize the pelvis and prevents the hips from sagging or lifting.
Your head should be in a neutral position, looking down at the floor, and your neck should remain relaxed. Avoid tilting your head upward or letting it drop, as this can strain the cervical spine. The shoulder blades should be slightly retracted and depressed, creating space between the shoulders and ears. This alignment helps distribute tension evenly across the upper body. Additionally, your glutes should be contracted to support the pelvis, and your legs should be straight with quads engaged. Maintaining this full-body tension is what makes the plank an effective exercise, but it requires conscious effort and practice.
Breathing is another critical component often overlooked. Many people tend to hold their breath while holding a plank, which can increase blood pressure and reduce oxygen flow to muscles. Instead, focus on slow, controlled breathing, inhaling through the nose and exhaling through the mouth. Each exhale can help deepen core engagement, but avoid excessive force. A steady breathing pattern also helps you relax the muscles that do not need to be tense, such as the jaw and shoulders, allowing you to hold the plank longer with proper form.
Common Mistake 1: Sagging Hips
One of the most frequent errors in plank execution is allowing the hips to lift too high. This position shifts the work away from the core and places excessive stress on the shoulders and arms. When the hips rise, the body no longer forms a straight line, and the abdominal muscles become less active. This can reduce the exercise’s effectiveness and increase the risk of strain in the upper body.
To correct this, focus on aligning your body into a straight line. Imagine a rod extending from your head to your heels, and keep your hips in line with it. Engaging your glutes and abdominal muscles can help lower your hips into position. You might also try lifting your pelvic floor slightly, as if you are trying to stop the flow of urine, which can naturally engage the lower core. If you find it challenging to maintain the position, you can modify the plank by starting on your knees, then progressively straighten your legs as strength improves. This modification allows you to practice proper alignment without compromising form.
Another cue is to actively pull your belly button toward your spine, creating a slight posterior pelvic tilt. This action flattens the lower back and helps prevent the hips from sagging. Visualizing your body as a stiff board can also help maintain tension. Over time, you will develop the strength to hold a straight plank for extended periods, but remember that quality is more important than duration. A few seconds of correct alignment is better than a minute of poor posture.
Common Mistake 2: Arching the Lower Back
On the opposite end of the spectrum, some individuals let their lower back arch excessively, causing the hips to sag toward the floor. This position places undue stress on the lumbar spine and can lead to lower back pain, especially for those with pre-existing issues. An arched back often results from weak abdominal muscles that fail to support the spine, or from a lack of awareness about neutral spine alignment.
To address this, you need to actively engage your core to tilt your pelvis slightly posteriorly. Think of tucking your tailbone under slightly, which helps flatten the lower back. However, avoid over-tucking, which can cause the hips to lift. Finding a neutral position is key. Practice by lying on your back with your knees bent and placing your hand under your lower back. You want to feel a small natural curve, not a large gap. From there, imagine pressing your lower back toward the floor while maintaining the curve, which teaches you to engage your core without flattening completely.
In the plank position, you can use a mirror or ask a partner to check your alignment. Alternatively, you can place a rolled towel under your lower back to feel if it touches, indicating over-arching. Once you correct the alignment, you should feel a deep engagement in your abdominal muscles, not pressure in your spine. If you continue to feel discomfort, it may be wise to consult a fitness professional or physical therapist to assess your form and provide personalized guidance.
Common Mistake 3: Holding the Breath
Breathing is often neglected during exercise, and the plank is no exception. Many people unintentionally hold their breath while concentrating on maintaining the position. This can lead to increased tension, elevated blood pressure, and reduced endurance. Moreover, breath-holding can cause you to tire more quickly, making it harder to maintain proper form.
To avoid this, establish a steady breathing rhythm from the moment you get into the plank. Inhale deeply through your nose for a count of three, then exhale slowly through your mouth for a count of three. Some individuals find it helpful to count breaths or use a timer to focus on breathing. As you exhale, you can gently draw your navel toward your spine, reinforcing core engagement. This breath-core connection not only improves oxygen flow but also enhances stability.
If you notice that you are holding your breath, reset and pause. Take a few deep breaths, then resume the plank. Over time, breathing will become automatic, and you will be able to maintain a steady pace. Remember that the plank is about endurance, and good breathing supports endurance. Consistently practicing deep, controlled breathing during the plank can also carry over to other exercises, improving your overall workout quality.
Additional Tips for Long-Term Success
Beyond correcting the three common mistakes, several strategies can help you improve your plank and avoid future issues. First, always warm up before attempting a plank. A brief warm-up, such as dynamic stretches or light cardio, increases blood flow to muscles and prepares your body for the demands of the exercise. This can reduce the risk of injury and improve performance.
Second, vary your plank routine to keep the body challenged and prevent overuse injuries. Incorporate side planks, planks on an unstable surface like a Bosu ball, or engage in plank variations such as shoulder taps or leg lifts. These variations target different muscle groups and add variety to your workouts. However, ensure you master the basic plank before advancing to more complex moves.
Third, consider integrating the plank into a full workout program that includes strengthening exercises for the posterior chain, such as glute bridges or back extensions. A balanced approach helps maintain overall musculoskeletal health and supports proper posture. Additionally, listen to your body. If you experience sharp pain, numbness, or tingling, stop the exercise and seek professional advice. The plank should challenge you, but it should not cause pain. By staying mindful of your form and making progressive adjustments, you can enjoy the benefits of the plank while minimizing the risk of injury.
Remember: quality over quantity. A well-executed plank for 20 seconds is more beneficial than a sloppy plank for a minute.
In conclusion, the plank is a versatile and effective exercise when performed correctly. By focusing on alignment, core engagement, and proper breathing, you can avoid common pitfalls and get the most out of your efforts. Whether you are a beginner or an experienced athlete, regularly reviewing your form and making subtle corrections will help you master the plank and support your overall fitness goals.